
If you are using UniFi devices such as their networking or security products, there isn’t much to do in order to make them work with a 3rd party
gateway. UniFi Talk however is a different beast due to SIP.
Most people will have an issue when using a 3rd party router in front of UniFi Talk, where incoming calls have 15-20 seconds of dead air, before your Talk system connects.
This could be a killer for incoming call traffic to your home or business as people will think the call failed, and hangup before the system connects.
This tutorial covers correcting this issue by getting the native UniFi Talk service working behind our favorite 3rd party router OS, pfSense!1
We have a few assumptions about the setup for this guide.
- You are using pfSense as your edge router.
- Everything is in a single LAN (No VLANs).
- Your UniFi Talk system is running on a CloudKey Gen2+ and not a Dream Machine.
- You are using the UniFi Talk service and not a 3rd party SIP Provider!
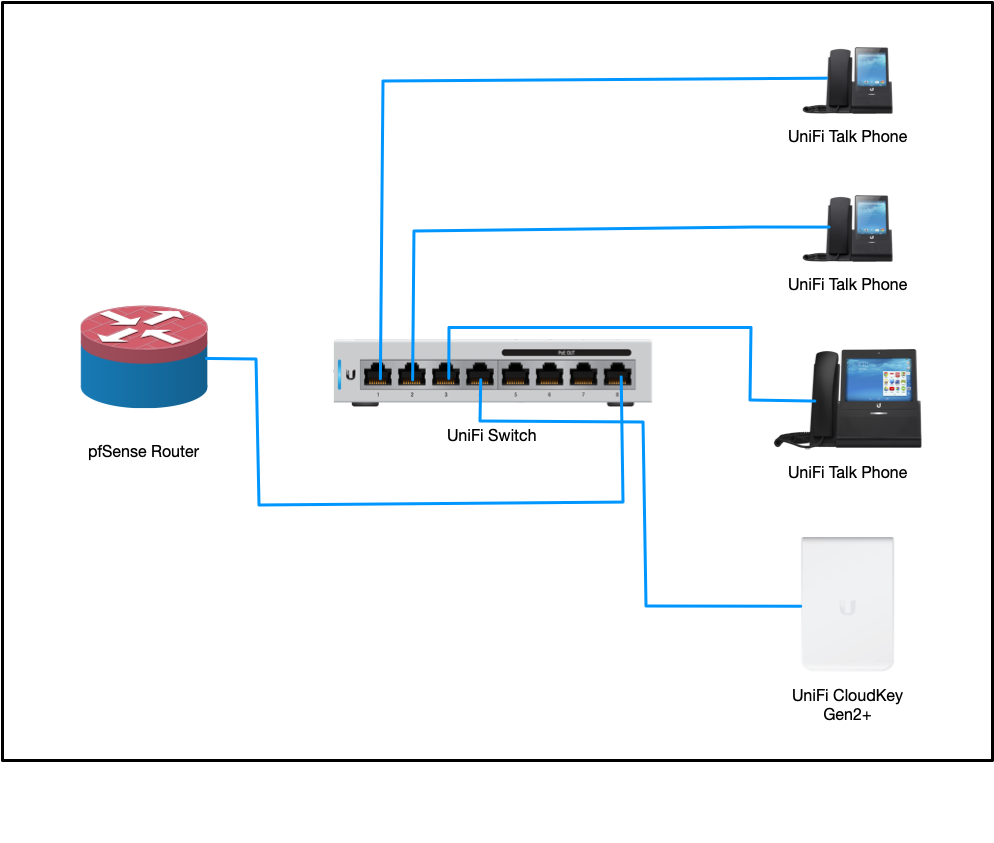
Network Path
Your network path should be fairly simple and look something like this:
Configuring UniFi Talk
UniFi Talk can be configured normally, however under Settings > System you should enable Static Signaling Port.
Configuring pfSense
This is the tricky part. UniFi Talk is using Twilio as the SIP provider, so you must configure a few things for their IP ranges to come in on the correct ports.
Twilio’s IP ranges2 can change over time, so be sure to double-check their IP page if you begin to notice problems.
In pfSense create a Firewall Alias called TwilioIPRanges with the Type set to Network(s) and include the following networks (as of this tutorial’s publishing date):
54.172.60.0/30 # VA Signaling IPs
54.172.60.0/23 # VA Media IPs
34.203.250.0/23 # VA Media IPs
54.244.51.0/30 # OR Signaling IPs
54.244.51.0/23 # OR Media IPs
You may notice that there are some overlapping ranges. This is done intentionally as we are planning to automate syncing these aliases in the future.
Now we will configure a Firewall Alias for Ports called UniFiTalkPorts with the Type set to Port(s) and include the following port ranges:
6767 # Static Signaling
16384:32768 # RTP Ports
10000:20000 # Twilio Media
5060:5061 # Twilio Signaling
These are the various ports used by Twilio that need to have custom incoming NAT rules.
Now we can create the NAT rule that allows all of this to work. Due to the large range of open ports occurring on both TCP and UDP, we are
restricting the NAT rule to only function with the TwilioIPRanges alias we created before.
Go to Firewall > NAT and add a new NAT rule with the following parameters:
Disabled: Unchecked
No RDR: Unchecked
Interface: WAN
Protocol: TCP/UDP
Source: Single host or alias - TwilioIPRanges
Source port range: Any
Destination: WAN address
Destination port range: Other - UniFiTalkPorts
Redirect target IP: {IP Address of your CloudKey}
Redirect target port: Other - UniFiTalkPorts
Description: UniFi Talk System - Twilio
No XMLRPC Sync: Unchecked
NAT reflection: Use system default
Filter rule association: Add associated filter rule
Once you apply this new NAT rule your UniFi Talk system should no longer have the 15-20 seconds of dead air before your phones ring, or your smart attendant picks up.
-
While we prefer pfSense and this tutorial is based around it, these steps are easily translatable to most routers. ↩